This sample introduces the KINGSTAR Fieldbus functions that handle EtherCAT communications, configure EtherCAT slaves and KINGSTAR Subsystem, and perform additional tasks. It also introduces the functions that set and get axis parameters. Note, however, that it doesn't include motion functions. That is, you can't use KINGSTAR motion functions to move your axes in manual mode, such as the functions in Axis PTP motion. If you want to use these functions, you will need to purchase one of the KINGSTAR Motion packages.
Compile and run the sample
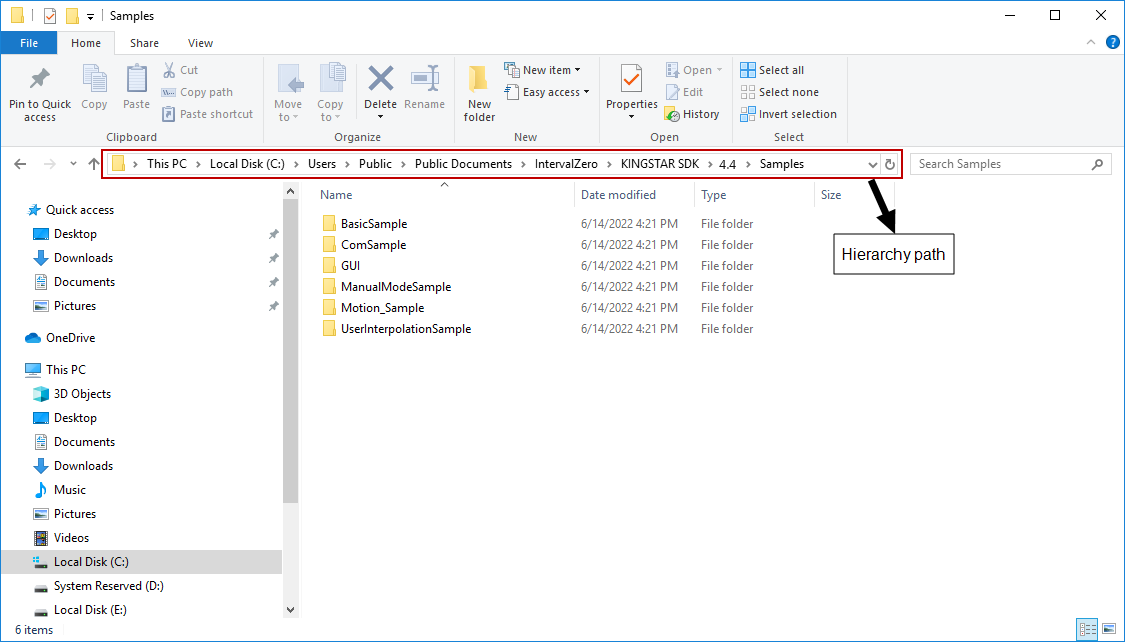
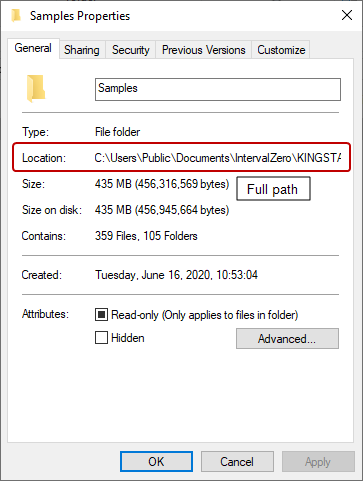
The file is located at C:\Users\Public\Public Documents\IntervalZero\KINGSTAR SDK\<Version Number>\Samples\ManualModeSample. Open ManualModeSample.sln and compile it.
NOTE: File Explorer has two paths: the hierarchy path and full path. The hierarchy path is shown in the address bar. The full path is shown in <File Name> Properties—if you right-click ManualModeSample.sln and click Properties, you'll see the Location is C:\Users\Public\Documents\IntervalZero\KINGSTAR SDK\<Version Number>\Samples\ManualModeSample, which is the full path. Notice that in the hierarchy path it is Public Documents. If you are using a non-English Windows system, and you want to copy and paste the path to the address bar to find the sample quickly, you must use the full path. If you want to browse to the sample folder through clicks, use the hierarchy path. For English Windows, folder redirection is done automatically. Even if you paste the hierarchy path, File Explorer can lead you to the sample.
|
|
The figure below shows the output of the sample:

Set project properties in Visual Studio
The sample is developed using C in Visual Studio 2019. When developing your own applications, you can choose your own development environment, as lon as the application is 64-bit. The use of 64-bit is required to control the real-time Subsystem.
When you create your own application, you need to modify the following properties in Visual Studio:
- In Solution Explorer, right-click the project name and then click Properties.
- In (Project name) Property Pages dialog box, in the left pane, expand the C/C++ list and click General.
- In the right area, in the Additional Include Directories box, enter "
$(RTX64SDKDir4)include;$(KINGSTARSDKDir4)include;%(AdditionalIncludeDirectories)" without space. - In the left pane, expand the Linker list and click General.
- In the right area, in the Additional Library Directories box, enter "
$(RTX64SDKDir4)lib\$(Rtx64Platform);$(KINGSTARSDKDir4)lib\amd64;%(AdditionalLibraryDirectories)" without space. - In the left pane, in the Linker list, click Input.
- In the right area, in the Additional Dependencies box, enter the following strings depending on the build target:
- RtssDebug and RtssRelease builds: enter "
startupCRT.lib;libcmtd.lib;libcpmtd.lib;libucrtd.lib;libvcruntimed.lib;rtx_rtss.lib;ksapi_rtss.lib" without space. - Debug and Release builds: enter "
rtapi.lib;ksapi.lib" without space. - Click Apply and then click OK.
- In the header file of the project (the name is
ProjectName.h), under #endif // UNDER_RTSS, enter the following code:
#include <ksapi.h>
#include <ksmotion.h>

Grouped functions
To improve the readability of the code, the functions are grouped using #pragma in the sample. You can identify the use of the function by its #pragma code.
Global variables
At the beginning of the sample, we declare two global variables to be used across the functions.
bool AxisPower = false;
int AxisResolution = 10000;
AxisPower checks whether the power of an axis is turned on. AxisResolution is the resolution of an axis (servo drive). We'll talk about these variables in later sections.
Check the state of an axis
After declaring the global variables, we define the function ProcessStatus that checks the state of an axis using CiA 402 standard. CiA 402, created by CAN in Automation (CiA) group, is a specification that defines operational modes and functional behaviors for motion devices.
unsigned short wStatus = 0;
T_DS402_State CiAState = state_not_ready;
ReadAxisStatusWord(targetAxis, &wStatus);
In ProcessStatus, we declare two variables: wStatus and CiAState. wStatus is used to get the operating state, while CiAState sets the operating state according to the result wStatus gets. We then use
ReadAxisStatusWord to get the operating state from an axis.
if (wStatus & 0x08)
   CiAState = state_malfunction;
else if ((wStatus & 0x6F) == 0x27)
   CiAState = state_op_enabled;
else if ((wStatus & 0x6F) == 0x07)
   CiAState = state_quick_stop;
else if ((wStatus & 0x6F) == 0x23)
   CiAState = state_switched_on;
else if ((wStatus & 0x6F) == 0x21)
   CiAState = state_ready_to_switchon;
else if ((wStatus & 0x4F) == 0x40)
   CiAState = state_switchon_dis;
else if ((wStatus & 0xF) == 0x0)
   CiAState = state_not_ready;
An axis has a sequence of bits to denote different states. These bits are in the StatusWord object.
For example:
bit 0 is ready to switch on
bit 1 is switched on
bit 2 is operation enabled
When a bit is TRUE, it means the axis is in the state indicated by the bit. We can know whether the axis is working properly by checking the StatusWord bits.
After wStatus gets the state, we check its bits. The first line of code, if (wStatus & 0x08), means "if the bit in wStatus AND the bits of 0x08 are TRUE." & is a bitwise AND. The result of AND is one (TRUE) if both bits are one.
The binary value of 0x08 is 0000 1000. Notice that the fourth bit (counted from right) is one. If wStatus & 0x08 is TRUE, it means the fourth bit in wStatus has to be 1. When this condition is TRUE, CiAState is set to state_malfunction, because in CiA 402 state the fourth bit is "fault." This code block checks whether the specific bits are TRUE, and set the corresponding state according to the result.
if (power)
{
   if (CiAState == state_malfunction)
      WriteAxisControlWord(targetAxis, 0x80);
   else if (CiAState == state_op_enabled)
      WriteAxisControlWord(targetAxis, 0xF);
   else if (CiAState == state_switched_on)
      WriteAxisControlWord(targetAxis, 0xF);
   else if (CiAState == state_ready_to_switchon)
      WriteAxisControlWord(targetAxis, 0x7);
   else
      WriteAxisControlWord(targetAxis, 0x6);
}
else
{
      WriteAxisControlWord(targetAxis, 0);
}
return (CiAState == state_op_enabled);
Next, we use WriteAxisControlWord to deal with the states when an axis is turned on. Just like StatusWord, ControlWord has a sequence of bits to denote different commands. Look at the first condition, if (CiAState == state_malfunction). If we find that an axis is not working properly, we sends the command 0x80, which means "Fault resets." This code block checks different states first, and sending commands to handle them. If the axis is turned off, we don't send any command.
When CiAState is state_op_enabled, ProcessStatus returns TRUE.
Run the cyclical task
Another function we define is CyclicTask. This function will be called every cycle. We use CyclicTask to call ProcessStatus, so we can check the state of an axis every cycle.
static int TargetPosition = 0;
int TargetAxis = 0;
bool Enabled = ProcessStatus(TargetAxis, AxisPower);
We declare two variables: TargetPosition and TargetAxis. TargetPosition denotes the target position of an axis, while TargetAxis is the index of an axis. We then declare the variable Enabled, which stores the return value of ProcessStatus.
When Enabled is TRUE, we use an equation to move an axis at a constant velocity of 360 degrees per second. When Enabled is FALSE, we use ReadAxisActualPosition to read the current position of an axis from the primary encoder.
Configure the KINGSTAR Subsystem
Before starting the KINGSTAR Subsystem, you must initialize the process and variables. If an unexpected error occurs, the call will return the error code from the KsError type. No other function is available until the Subsystem initializes successfully. Any previous settings are overwritten.
See the function int _tmain. Before we initialize the process and variables, we declare the following variables:
SlaveStatus axis = { 0 };
KsCommandStatus Command = { 0 };
KsError Code = errNoError;
SlaveStatus axis = { 0 }– SlaveStatus is a structure that contains the details of an EtherCAT slave. We useaxisto get our slave's information.KsCommandStatus Command = { 0 }– KsCommandStatus is a structure that contains the states of a function. You can know whether the function is running, completes its work, returns any error, and what the error is. We useCommandto get the state of a function.KsError Code = errNoError– KsError is an enum type that contains all error codes of KINGSTAR.errNoErrormeans the function succeeded.
The initialization process is contained in #pragma region Initialization. Notice that we use Code to check whether a function runs successfully. It receives the return value of a function. If Code is not errNoError, the program will jump to the End block and run the code in it.
Prepare to link to the KINGSTAR Subsystem
First, we call Create, which prepares to link your application to the KINGSTAR Subsystem. Before you start anything, Create must be the first function to call.
Code = Create(0, 0);
if (Code != errNoError) {
   RtPrintf("Failed to create: 0x%x\n", Code);
   goto End;
}
Set the EtherCAT cycle time
SetCycleTime sets the EtherCAT cycle time. The unit of time is second. In the sample, cycle1000 means 1 millisecond. If you want to type a number, it is SetCycleTime(0.001). We use variables to represent numbers. You can find the following definitions in ksapi.h, which is located at C:\Program Files\IntervalZero\KINGSTAR SDK\4.0\Include.
| Variables | Number |
|---|---|
| cycle100 | 0.0001 |
| cycle125 | 0.000125 |
| cycle250 | 0.000250 |
| cycle500 | 0.0005 |
| cycle1000 | 0.001 |
High Speed Timer Package is required to use a cycle time that is less than 1 millisecond. Not all axes support fast cycle times. If an unsupported cycle time is selected, the update time for each axis is automatically and independently extended. To use fast cycle times, ensure that the network card on the computer is capable. Only the network cards with low latencies are able to support fast cycles.
Code = SetCycleTime(cycle1000);
if (Code != errNoError) {
   RtPrintf("Failed to set cycle time: 0x%x\n", Code);
   Destroy();
   goto End;
}
Disable the logs on the RTX64 Server Console
EnableServerLog enables or disables the real-time messages on the RTX64 Server Console. If you disable them, the console will display only KINGSTAR messages. We choose to disable it.
Code = EnableServerLog(FALSE);
if (Code != errNoError) {
   RtPrintf("Failed to set server log: 0x%x\n", Code);
   Destroy();
   goto End;
}
Set an access mode
SetAxisAccessMode sets the data transfer mode for EtherCAT drives. The access mode determines the control mode your axes can use. An access mode can be selected from the KsAccessMode enum type. By default, the access mode is accessVelPos. We use accessPosVel.
Code = SetAxisAccessMode(accessPosVel);
if (Code != errNoError) {
   RtPrintf("Failed to set access mode: 0x%x\n", Code);
   Destroy();
   goto End;
}
Enable the digital input of an axis
EnableAxisInput enables or disables the access to the digital inputs of an axis. The first three bits of the inputs are Negative Overtravel, Positive Overtravel, and Home Sensor. If you enable the inputs, you can access the Overtravel bits.
Code = EnableAxisInput(TRUE);
if (Code != errNoError) {
   RtPrintf("Failed to set servo inputs: 0x%x\n", Code);
   Destroy();
   goto End;
}
Complete the Subsystem configuration
KINGSTAR provides many settings to configure, yet only a subset are used in this sample. Other settings can be found in the online or offline help > KINGSTAR RT and Win32 APIs > KINGSTAR Fieldbus > Functions > Axis variable.
Most settings are optional, however, there are two settings that must be configured: EtherCAT cycle time and access mode. The default value for either setting may not be suitable for your needs. You should set a value for each that is appropriate for your axis.
In the sample, we use the following code to show that the Subsystem configuration is done.
RtPrintf("Subsystem configured\n");Output:

Start the KINGSTAR Subsystem
We use Start to start the KINGSTAR Subsystem and EtherCAT network. In case the Subsystem fails to start and the program waits forever for it to complete, we use WaitForCommand to set a timeout of 30 seconds for Start. If the KINGSTAR Subsystem can't be started, we use Destroy to close the link to the Subsystem and terminates it.
Command = WaitForCommand(30, TRUE, Start());
if (!Command.Done) {
   RtPrintf("Failed to start EtherCAT: 0x%x\n", Command.ErrorId);
   Destroy();
   goto End;
}
RtPrintf("Subsystem Started\n");
Output:

After the Subsystem is started, we want to query its state. To do this, we use the SubsystemStatus structure and the GetStatus function.
SubsystemStatus Subsystem = { ecatOffline, ecatOffline,
0, 0, 0, {ecatOffline}, {ecatOffline}, {axisOffline} };
SubsystemStatus contains the details of an EtherCAT network. We can know the EtherCAT state of the master and slaves, the total number of EtherCAT slaves, the number of axes and I/O modules on the EtherCAT network, and others. We use the variable Subsystem to get the information of the EtherCAT network. We assign initial values to Subsystem, so we can tell whether Subsystem's values change when data is passed to it.
Code = GetStatus(&Subsystem, NULL);
if (Code != errNoError) {
RtPrintf("Failed to get status: 0x%x\n", Code);
goto Exit;
}
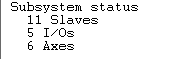
RtPrintf("Subsystem status\n %d Slaves\n %d I/Os\n %d Axes\n\n",
Subsystem.SlaveCount, Subsystem.IOCount, Subsystem.AxesCount);GetStatus gets the state of the EtherCAT network we created. The state is passed to Subsystem. We fill NULL for the second parameter because we don't use it. Again, we use Code to check whether GetStatus is run successfully. If it is, the Subsystem state, which contains the number of EtherCAT slaves, axes, I/O modules, will be displayed on the RTX64 Server Console.
Output:
Get the state of an axis
We use GetAxisByIndex to get the state of an axis. First, we declare the variable TargetAxis, which is the index of an axis, and set it to zero. This indicates that we want to get the information of the axis whose index is zero.
Next, we call GetAxisByIndex. axis is a SlaveStatus variable. AxisResolution is a global variable we declare at the beginning of the sample. Its initial value is 10000. The last two parameters are set to NULL because we don't use them.
int TargetAxis = 0;
Code = GetAxisByIndex(TargetAxis, &axis, &AxisResolution, NULL, NULL);
if (Code != errNoError) {
RtPrintf("Failed to get axis status: 0x%x\n", Code);
goto Exit;
}
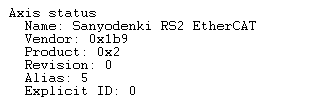
RtPrintf("Axis status\n Name: %s\n Vendor: 0x%x\n Product: 0x%x\n
Revision: %d\n Alias: %d\n Explicit ID: %d\n\n",
axis.Name, axis.VendorId, axis.ProductCode, axis.RevisionNumber,
axis.AliasAddress, axis.ExplicitId);We use Code to check whether the function runs successfully, as usual. If it does, the information of Axis Zero will be displayed on the RTX64 Server Console.
Output:
Set a control mode for an axis
We use SetAxisControlMode to set the control mode for our axis. Since we use manual mode in this sample, we set the control mode to modeManual. To prevent the function from running too long, we use WaitForCommand to set a timeout for SetAxisControlMode. The timeout is 1 second.
Command = WaitForCommand(1, TRUE, SetAxisControlMode(TargetAxis, modeManual));Check the operating state of an axis every cycle
We use RegisterCallback to register CyclicTask so KINGSTAR Subsystem will call it every cycle when new data comes in. CyclicTask checks ProcessStatus, which is used to check the operating state of an axis. If the axis is working properly, ProcessStatus returns TRUE, which is received by CyclicTask, which then moves the axis at a constant velocity. For more information about ProcessStatus and CyclicTask, See Check the state of an axis and Run the cyclical task.
Code = RegisterCallback(&CyclicTask, NULL);AxisPower = true;
Sleep(30000);
AxisPower = false;We set AxisPower to TRUE, and wait 30 seconds for CyclicTask to run, and then we set AxisPower to FALSE.
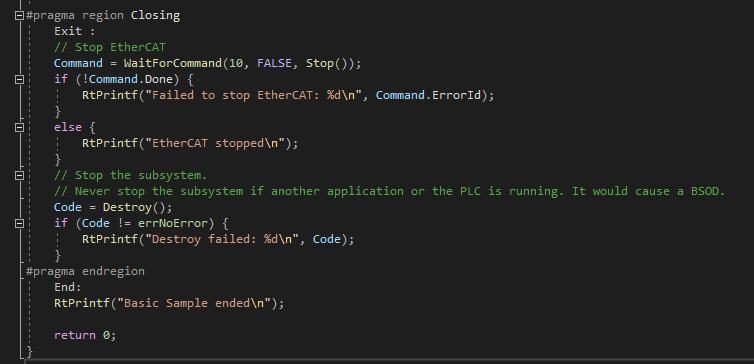
Stop the KINGSTAR Subsystem
We use two functions to stop the KINGSTAR Subsystem: Stop and Destroy.
- Stop stops the EtherCAT network and the KINGSTAR Subsystem.
- Destroy closes the link to the KINGSTAR Subsystem and terminates the Subsystem.
Since the Subsystem needs some time to stop, we use WaitForCommand to give it 10 seconds to stop. If it's not done within the time, the next command, Destroy, will be executed.
Exit:
//Stop EtherCAT
Command = WaitForCommand(10, FALSE, Stop());
if (!Command.Done) {
   RtPrintf("Failed to stop EtherCAT: %d\n", Command.ErrorId);
}
else {
   RtPrintf("EtherCAT stopped\n");
}
//Stop the Subsystem.
//Never stop the Subsystem if another application or the PLC is running. It would cause a BSOD.
Code = Destroy();
if (Code != errNoError) {
   RtPrintf("Destroy failed: %d\n", Code);
}
Stop and Destroy are contained in the Exit block, which is run when the Subsystem is not started successfully, or when GetAxisByIndex doesn't get the state of an axis. When you use these two functions, it's not necessary to contain them in any block. You can use them depending on your needs.
The End block is run when a function doesn't run successfully.
End:
RtPrintf("Basic Sample ended\n");
Output:
