This sample shows how to use the KINGSTAR Subsystem through a Win32 application and introduces the API functions. In this sample, Win32 refers to Windows API, not 32 bit. KINGSTAR Win32 APIs are the same as KINGSTAR RT APIs. When using the Win32 interface, you don't need to understand RTX64 and real-time development. Starting and stopping the Subsystem automatically starts and stops the real-time environment.
Because the link between real-time and non-real-time needs to be asynchronous and Windows is not a real-time environment, all calls to the Subsystem are queued. Therefore, you can't have very short (<5 ms) update cycles in your application. If you need faster update cycles, consider using the RT interface instead.
Compile and run the sample
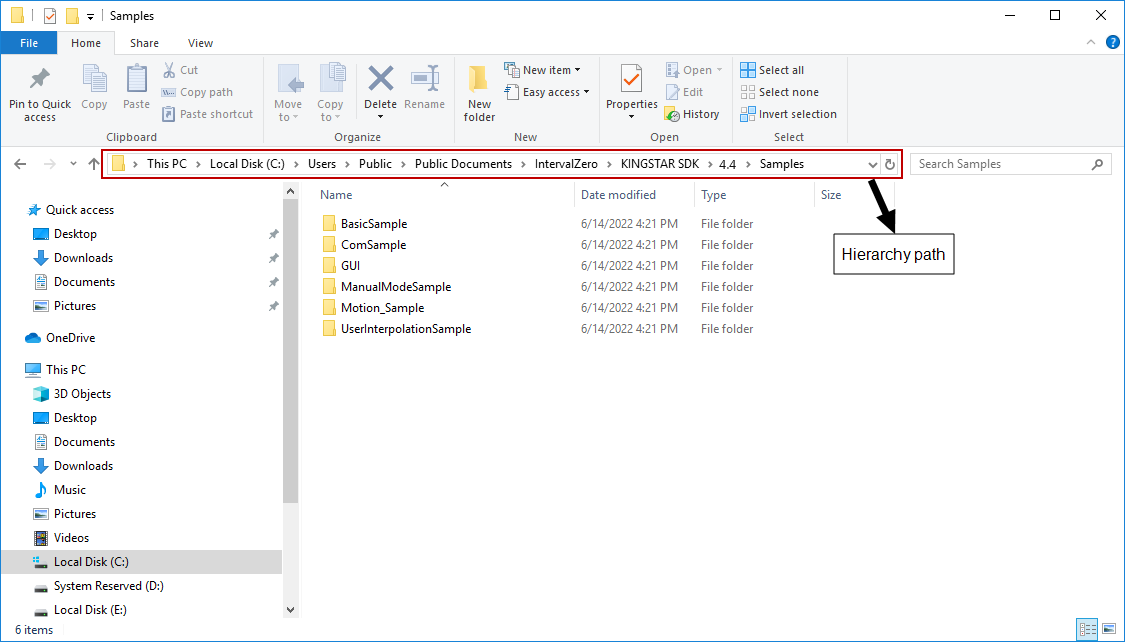
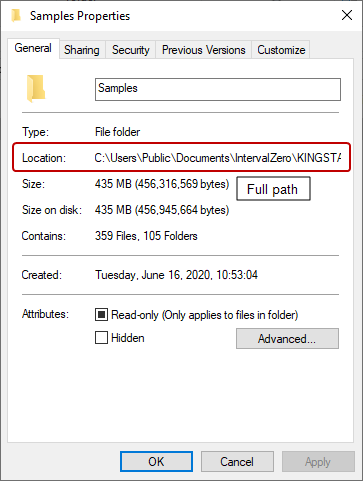
The sample file is located at C:\Users\Public\Public Documents\IntervalZero\KINGSTAR SDK\<Version Number>\Samples\Motion_Sample. Open Motion_Sample.sln and compile it.
NOTE: File Explorer has two paths: the hierarchy path and full path. The hierarchy path is shown in the address bar. The full path is shown in <File Name> Properties—if you right-click Motion_Sample.sln and click Properties, you'll see the Location is C:\Users\Public\Documents\IntervalZero\KINGSTAR SDK\<Version Number>\Samples\Motion_Sample, which is the full path. Notice that in the hierarchy path it is Public Documents. If you are using a non-English Windows system, and you want to copy and paste the path to the address bar to find the sample quickly, you must use the full path. If you want to browse to the sample folder through clicks, use the hierarchy path. For English Windows, folder redirection is done automatically. Even if you paste the hierarchy path, File Explorer can lead you to the sample.
|
|
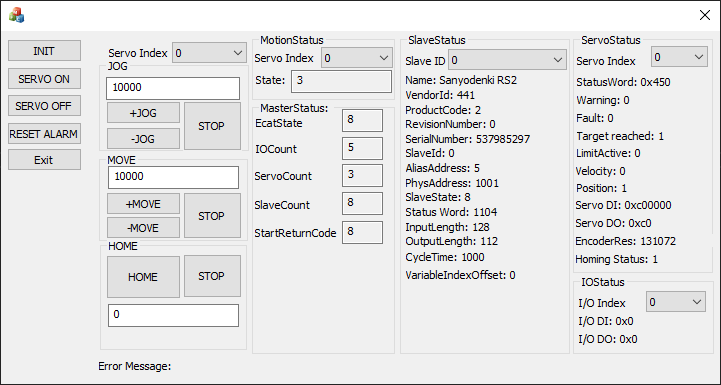
The figure below shows the output of the sample:
Set project properties in Visual Studio
This sample is an MFC application developed using C++ in Visual Studio 2019, and MFC 64-bit. When developing your own applications, you can choose your own development environment, as long as the application is 64-bit. The use of 64-bit is required to control the real-time Subsystem. For more information about the user interface of the Motion Sample, see its user interface.
When you create your own application, you need to modify the following properties in Visual Studio:
- In Solution Explorer, right-click the project name and then click Properties.
- In (Project name) Property Pages dialog box, in the left pane, expand the C/C++ list and click General.
- In the right area, in the Additional Include Directories box, enter "
$(RTX64SDKDir4)include;$(KINGSTARSDKDir4)include;%(AdditionalIncludeDirectories)" without space. - In the left pane, expand the Linker list and click General.
- In the right area, in the Additional Library Directories box, enter "
$(KINGSTARSDKDir4)lib\amd64\;%(AdditionalLibraryDirectories)" without space. - In the left pane, in the Linker list, click Input.
- In the right area, in the Additional Dependencies box, enter "
KsApi.lib;%(AdditionalDependencies)" without space. - Click Apply and then click OK.
- In the header file of the project (the name is
ProjectName.h), under #endif // UNDER_RTSS, enter the following code:
#include <ksapi.h>
#include <ksmotion.h>

Configure the KINGSTAR Subsystem
Use the OnBnClickedInit function to start the KINGSTAR Subsystem. This function is called when you click Init in the Main menu area. It gets the parameter m_hWnd through the GetSafeHwnd function, which is the handle to the active window. After that, it creates a new thread using the _beginthread function, in which the address of InitThread is passed. The InitThread function does all the work to initialize KINGSTAR Subsystem, including the settings of parameters, feature, axes and I/O modules, and connection.
The following variables are used across the sample. They are declared at the beginning of Motion_TestDlg.cpp.
KsCommandStatus Command = { 0 }– KsCommandStatus is a structure that contains the states of a function. You can know whether the function is running, completes its work, returns any error, and what the error is. We useCommandto get the state of a function.KsError Code = errNoError– KsError is an enum type that contains all error codes of KINGSTAR.errNoErrormeans the function succeeded. We useCodeto receive the return value of a function.errNoErrormeans the function runs successfully. IfCodeis noterrNoError, Destroy will be called and the KINGSTAR Subsystem will be terminated.- Flags: notifies the program a condition is met.
LinkInit– signals whether an EtherCAT link has been created.LinkStart– signals whether the KINGSTAR Subsystem is started.BThreadFlag– signals whether a KINGSTAR process begins.BCloseFlag– signals whether a KINGSTAR process has been destroyed.Edit_Flag– signals the value in the text box is changed.UIInit_Flag– signals whether the user interface is ready to be initialized after the EtherCAT state is set to Op.
Initialize the link to the KINGSTAR Subsystem
First, we call Create, which prepares to link your application to the KINGSTAR Subsystem. Before you start anything, Create must be the first function to call.
Code = ::Create(0, 0);
if (Code != errNoError) {
   Str_Error.Format(_T("Failed to Create EtherCAT: %d\n"), Command.ErrorId);
   ::PostMessageA(hWnd, WM_UPDATE_ERROR, 0, 0);
   return;
}
BThreadFlag = true;
Set the EtherCAT cycle time
SetCycleTime sets the EtherCAT cycle time. The unit of time is second. To use the cycle time less than 1 millisecond, High Speed Timer Package is required. Note that not all axes support fast cycle times. If an unsupported cycle time is selected, the update time for each axis is automatically and independently extended. To use fast cycle times, ensure that the network card on the computer is capable. Only the network cards with low latencies are able to support fast cycles.
Code = ::SetCycleTime(cycle1000);
if (Code != errNoError) {
   Str_Error.Format(_T("Failed to set SetCycleTime: %d\n"), Command.ErrorId);
   ::PostMessageA(hWnd, WM_UPDATE_ERROR, 0, 0);
   ::Destroy();
   return;
}
Disable the logs on the RTX64 server console
EnableServerLog enables or disables the real-time messages on the RTX64 server console. If you disable them, the console will display only KINGSTAR messages. We choose to enable it.
Code = ::EnableServerLog(true);
if (Code != errNoError) {
   Str_Error.Format(_T("Failed to EnableServerLog: %d\n"), Command.ErrorId);
   ::PostMessageA(hWnd, WM_UPDATE_ERROR, 0, 0);
   ::Destroy();
   return;
}
Set an access mode
SetAxisAccessMode sets the data transfer mode for EtherCAT drives. The access mode determines the control mode your drives can use. An access mode can be selected from the KsAccessMode enum type. By default, the access mode is accessVelPos.
Code = ::SetAxisAccessMode(accessVelPos);
if (Code != errNoError) {
   Str_Error.Format(_T("Failed to SetAxisAccessMode: %d\n"), Command.ErrorId);
   ::PostMessageA(hWnd, WM_UPDATE_ERROR, 0, 0);
   ::Destroy();
   return;
}
Enable the digital input and output of an axis
EnableAxisInput and EnableAxisOutput enables or disables the access to the digital inputs and outputs of an axis. The first three bits of the inputs are Negative Overtravel, Positive Overtravel, and Home Sensor. If you enable the inputs, you can access the Overtravel bits.
Code = ::EnableAxisInput(TRUE);
if (Code != errNoError) {
   Str_Error.Format(_T("Failed to EnableAxisInput: %d\n"), Command.ErrorId);
   ::PostMessageA(hWnd, WM_UPDATE_ERROR, 0, 0);
   ::Destroy();
   return;
}
Code = ::EnableAxisOutput(TRUE);
if (Code != errNoError) {
Str_Error.Format(_T("Failed to EnableAxisOutput: %d\n"), Command.ErrorId);
::PostMessageA(hWnd, WM_UPDATE_ERROR, 0, 0);
::Destroy();
return;
}Set a number of simulated axes
SetConfiguredAxesCount sets a number of simulated axes. We set the number to one. If there are no real axes, one simulated axis will be created for the EtherCAT network.
::SetConfiguredAxesCount(1);Enable actual velocity
EnableActualVelocity reads the actual velocity of an axis.
::EnableActualVelocity(true);Motion parameters, unit conversion, and simulated I/O modules
Before we link our sample to the KINGSTAR Subsystem, we use the following functions to set the motion parameters and conversion ratio for axes and I/O modules.
SetAxisMotionProfile: sets the motion profile of an axis. In the sample, the motion profile is defined in the instance of the McProfileSettings structure, ProfileSettings.
SetAxisCountsPerUnit: sets the conversion ratio of the user-defined position unit to the count (pulse) unit used by an axis. In the sample, Numerator and Denominator are one, so the ratio is 1:1. Reverse is false, so the direction of the axis is not reversed.
EnableAxisUnitConversion: enables the axis to use a real-world unit. After you set a conversion ratio using SetAxisCountsPerUnit, you need to use this function to enable the conversion so the ratio takes effect.
ConfigureIo: configures the settings of a simulated I/O module.
SubsystemStatus: this structure is used to get the states of an EtherCAT link. We declare an instance of SubsystemStatus, KSMStatus, and use the AxesCount field to get the number of axes on the EtherCAT network.
SlaveStatus: this structure is used to configure the simulated I/O modules settings. InputLength and OutputLength are the necessary fields you need to fill. They determine how many inputs and outputs for a simulated I/O modules. Other fields in SlaveStatus can be left empty and they'll be filled with the default value. If you are using real I/O modules, KINGSTAR will automatically detect their inputs and outputs and populate all fields. We declare an instance of SlaveStatus, IoModuleStatus, to configure the settings.
//Set up axes.
for (int i = 0; i < KSMStatus.AxesCount; i++)
{
   ::SetAxisMotionProfile(i, profileUnitPerSecond, ProfileSettings);
   ::SetAxisCountsPerUnit(i, Numerator, Denominator, Reverse);
   ::EnableAxisUnitConversion(i, TRUE);
}

//Set up I/O modules.
for (int i = 0; i < IOCOUNT; i++)
{
   SlaveStatus IoModuleStatus = { 0 };
   IoModuleStatus.InputLength = 16;
   IoModuleStatus.OutputLength = 16;
   ::ConfigureIo(i, IoModuleStatus);
}
Start the KINGSTAR Subsystem
We use Start to start the KINGSTAR Subsystem and EtherCAT network. In the event that the Subsystem is unable to be started, causing the program to wait forever for it to complete, we use WaitForCommand to set a 30-second timeout for Start. If the Subsystem is started, the flag LinkInit and LinkStart will be set to true. If the KINGSTAR Subsystem can't be started, Start will be aborted and LinkInit is set to false.
After all the configuration is done and the KINGSTAR Subsystem is started, UIInit_Flag is set to true.
Command = WaitForCommand(30, TRUE,::Start());
if (Command.Done)
{
   LinkInit = LinkStart = true;
}
else
{
   Str_Error.Format(_T("Failed to Start: %d\n"), Command.ErrorId);
   ::PostMessageA(hWnd, WM_UPDATE_ERROR, 0, 0);

   LinkInit = false;
   return;
}
UIInit_Flag = true;
Use the KINGSTAR Subsystem
After you connect real devices to the KINGSTAR Subsystem, a few areas will show the information of your device: MotionStatus, MasterStatus, SlaveStatus, ServoStatus, IOStatus. Their information varies between your devices. You can use Slave ID to select the device you want. If there is no real devices, most of the fields in these areas will be zero.
Axis
The OnBnClickedServoOn and OnBnClickedServoOff functions enable and disable an axis, respectively.
Servo on
Before enabling an axis, we need to check some states. First is the EtherCAT connection. If its state is ecatOP, we check the EtherCAT link flag LinkStart. If it is true, we prepare to enable axes. Before enabling it, we use ResetAxis to reset the alarm, in case they have errors, and then we check SERVOCOUNT. If it is greater than zero, we check the StatusWord object of an axis. The third bit (bit 2) is "operation enabled." If this bit is true, the axis has been enabled. To know whether the third bit is true, we use the bitwise AND operator (&). The condition "if (ServoNoFlag(KSStatusWord[i]) != 1)" is described below:
- Perform a logical AND operation for the value of the selected axis and the hex value 0x4.
- Take the result from the AND operation and shift the bits of the value two positions to the right.
- After shifting the bits, check whether it is equal to one (1). If it is not, run the following code.
If the result is not equal to one, it means the axis is not enabled. We use PowerAxis to enable it. In PowerAxis, the Enable parameter is TRUE.
void CMotion_TestDlg::OnBnClickedServoOn()
{
   if(KSMStatus.State == ecatOP)
   {
      if(LinkStart)
      {
         for(int i=0; i < KSMStatus.AxesCount; i++)
	     {
	        ::ResetAxis(i);

            #if SERVOCOUNT > 0
	        if (ServoNoFlag(KSStatusWord[i]) != 1)
	        {
	           ::PowerAxis(i, TRUE, TRUE, TRUE);
	        }
	        #endif
         }
      }
   }
   else
   {
      MessageBox(_T("KSMStatus->EcatState != ecatOP"));
   }
}
Servo off
To disable an axis, we use PowerAxis. Enable is FALSE.
void CMotion_TestDlg::OnBnClickedServoOff()
{
   for (int i = 0; i < KSMStatus.AxesCount; i++)
      ::PowerAxis(i, FALSE, TRUE, TRUE);
}
Reset an alarm
The OnBnClickedResetalarm function resets an alarm. It's possible an issue is arising while the axis is running. When it happens, an alarm appears. We use ResetAxis to reset the alarm of an axis.
void CMotion_TestDlg::OnBnClickedResetalarm()
{
   for (int i = 0; i < KSMStatus.AxesCount; i++)
   {
      ::ResetAxis(i);
   }
}
Motion control
Jog and Move are basic movements for testing axes. Jog is to test velocity without specifying a target position, and Move is to test a move with a target position. Home is to home an axis.
Jog
Jog uses a T-Curve acceleration in the given direction. The variable UJog_Pulse stores the velocity of jog, whose default value is 10000. m_AxisNumber.GetCurSel() gets the index of an axis. JogAxis makes a jog move. The moving direction can be forward or backward. +JOG uses the function OnBnClickedPjog to move forward, and -JOG uses OnBnClickedNjog to move backward.
void CMotion_TestDlg::OnBnClickedPjog()
{
   ::JogAxis(m_AxisNumber.GetCurSel(), double(UJog_Pulse), 36000, 36000, 360000, mcPositiveDirection);
}
void CMotion_TestDlg::OnBnClickedNjog()
{
   ::JogAxis(m_AxisNumber.GetCurSel(), double(UJog_Pulse), 36000, 36000, 360000, mcNegativeDirection);
}
To stop the jog move, use HaltAxis.
void CMotion_TestDlg::OnBnClickedJogstop()
{
   ::HaltAxis(m_AxisNumber.GetCurSel(), 3600, 360000, mcAborting);
}
When you enter a new value for jog's velocity, UJog_Pulse is updated. UpdateData reads the updated velocity on the UI. After the data has been changed, the flag Edit_Flag is set to true.
void CMotion_TestDlg::OnEnChangeJogPulse()
{
   Edit_Flag = false;
   UpdateData(true);
   Edit_Flag = true;
}
Move
Move uses the motion profile to create an S-Curve profile to the destination. It is similar to Jog. The variable UMove_Pulse stores the distance of a move, whose default value is 10000. m_AxisNumber.GetCurSel() gets the index of an axis. There are two MoveAxis functions: MoveAxisAbsolute and MoveAxisRelative. In this sample MoveAxisRelative is used. The moving direction can be forward or backward. +MOVE uses the function OnBnClickedPmove to move forward, and -MOVE uses OnBnClickedNmove to move backward.
void CMotion_TestDlg::OnBnClickedPmove()
{
   ::MoveAxisRelative(m_AxisNumber.GetCurSel(), double(UMove_Pulse), 3600, 36000, 36000, 3600000, mcAborting);
}
void CMotion_TestDlg::OnBnClickedNmove()
{
   ::MoveAxisRelative(m_AxisNumber.GetCurSel(), double(0-UMove_Pulse), 3600, 36000, 36000, 3600000, mcAborting);
}
To stop the move, use HaltAxis.
void CMotion_TestDlg::OnBnClickedMovestop()
{
   ::HaltAxis(m_AxisNumber.GetCurSel(), 3600, 360000, mcAborting);
}
When you enter a new value for MoveAxisRelative's distance, UJog_Pulse is updated. UpdateData reads the updated distance on the UI. After the data has been changed, the flag Edit_Flag is set to true.
void CMotion_TestDlg::OnEnChangeMovePulse()
{
   Edit_Flag = false;
   UpdateData(true);
   Edit_Flag = true;
}
Home
Home moves an axis to a known position. The homing process is written in the function OnBnClickedHome. To home an axis, first we use SetAxisParameter to set the homing mode. In this sample we choose mcSlaveHomingMode, which uses a homing method provided by a servo drive. Next, we use HomeAxis to home the axis. m_AxisNumber.GetCurSel() gets the index of an axis.
void CMotion_TestDlg::OnBnClickedHome()
{
   //There is test the slave homing.
   ::SetAxisParameter(m_AxisNumber.GetCurSel(), mcSlaveHomingMode, 33, mcImmediately);
   Command = WaitForCommand(30, TRUE, ::HomeAxis(m_AxisNumber.GetCurSel(), 0, HomeVel,
           HomeEndVel, HomeAcc, HomeDec, HomeJerk, mcPositiveDirection, homingSlave));
   if (!Command.Done)
   {
      Str_Error.Format(_T("Failed to Home: %d\n"), Command.ErrorId);
      GetDlgItem(IDC_ERROR_RETURN)->SetWindowText(Str_Error);
   }
}
To stop homing, use HaltAxis.
void CMotion_TestDlg::OnBnClickedHomestop()
{
   ::HaltAxis(m_AxisNumber.GetCurSel(), 3600, 360000, mcAborting);
}
Get the state
When hardware is connected, we can check its state through certain variables and functions.
Index
In this sample, there are five variables have been declared to receive the index of a device:
- m_AxisNumber: the index of an axis (servo motor). It is used as Servo Index in the Motion control area. See the user interface.
- m_ServoNumber: the index of an axis. It is used as Servo Index in the ServoStatus area.
- m_MotionNumber: the index of an axis. It is used as Servo Index in the MotionStatus area.
- m_SlaveNumber: the index of an EtherCAT slave. It is used as Slave ID in the SlaveStatus area.
- m_IONumber: the index of an I/O module. It is used as I/O Index in the IOStatus area.
The state of the EtherCAT master
To get the state of the EtherCAT master, use GetStatus.
GetStatus(&KSMStatus, KSSubsystemDiagnostics);The state of an EtherCAT slave
To get the state of an EtherCAT slave, use GetSlaveById.
::GetSlaveById(i, &KSSlaveStatus[i]);The state of an axis
To get the motion state of an axis (servo drive), use GetAxisMotionState.
In the SlaveStatus and ServoStatus areas, to get the information and encoder resolution of an axis, use GetAxisByIndex.
In the ServoStatus area, to get the CANopen (CiA 402) state of an axis, from StatusWord to LimitActive, use ReadAxisStatusWord.
In the ServoStatus area, to get the state of Velocity, Position, Servo DI, Servo DO, we need to use these functions: GetAxisVelocity, GetAxisPosition, ReadAxisInputs, ReadAxisOutputs.
In the ServoStatus area, to get Homing Status, we use the variable Read_HomingStatus to get the homing state from an axis. Typically, the first three bits (bit 0, 1, 2) of the digital inputs of a servo drive are Negative Overtravel, Positive Overtravel, and Home Sensor, but the bits may vary between servo drives. In this sample we check whether bit 0, or bit 1 and bit 2 (bit 1 and 2 are checked together) are TRUE, and assign the result to Read_HomingStatus.
while(BCloseFlag)
{
   while (BThreadFlag)
   {
      ::GetStatus(&KSMStatus, KSSubsystemDiagnostics);
      for(int i = 0; i < KSMStatus.AxesCount; i++)
      {
         ::GetAxisMotionState(i, MotionCXY[i].KSMcMotionState, MotionCXY[i].KSMcDirection);
         ::GetAxisByIndex(i, &KSAxisStatus[i], &AXIS_RESOLUTION[i], &AXIS_DI[i], &AXIS_DO[i]);
         ::ReadAxisStatusWord(i, &KSStatusWord[i]);   //Read StatusWord
         ::ReadAxisActualVelocity(i, MotionCXY[i].VelocityValue);   //Get Velocity status
         ::ReadAxisActualPosition(i, MotionCXY[i].PositionValue);   //Get PositionValue status
         SERVOIO_DI_ERROR[i] = ::ReadAxisInputs(i, &SERVOIO_DI[i]);   //Get ServoDI
         SERVOIO_DO_ERROR[i] = ::ReadAxisOutputs(i, &SERVOIO_DO[i]);   //Get ServoDO
         Read_HomingStatus[i] = HomingStatus(KSStatusWord[i]);
      }
   .........
}
The state of an I/O module
To get the state of an I/O module, we use ReadInputWord and ReadOutputWord. IO_DI and IO_DO receive the read WORD value.
for(int i = 0; i < KSMStatus.IOCount; i++)
{
   #if IOCOUNT > 0
   ::ReadInputWord(i, 0, &IO_DI[i]);
   ::ReadOutputWord(i, 0, &IO_DO[i]);
   #endif
}
Stop the KINGSTAR Subsystem
Before you stop the KINGSTAR Subsystem, you need to stop all axes. You can use HaltAxis to do it.
The KINGSTAR Subsystem must be stopped before closing your application. If the computer is unexpectedly turned off, all EtherCAT slaves that detect the missing master are placed in a safety alarm state. The Subsystem attempts to reset the slaves during the next start. However, some slaves may not run properly after restarting. If this occurs, shut down, restart, or reset these slaves. To reset the slaves, use the ResetAxis function, or restart the slaves.
Close the link
To ensure the KINGSTAR Subsystem is stopped, the close logic is added to the OnBnClickedExit function. First, we set the flag BCloseFlag and BThreadFlag to false. Next, we use Stop to stop the EtherCAT link, and Destroy to terminate the KINGSTAR Subsystem process.
void CMotion_TestDlg::OnBnClickedExit()
{
   BCloseFlag = BThreadFlag = false;
   ::Stop();
   ::Destroy();
   CDialogEx::OnOK();
}
If there are several applications using KINGSTAR, remember that none of them can call any KINGSTAR functions after Destroy has been called by one of them.