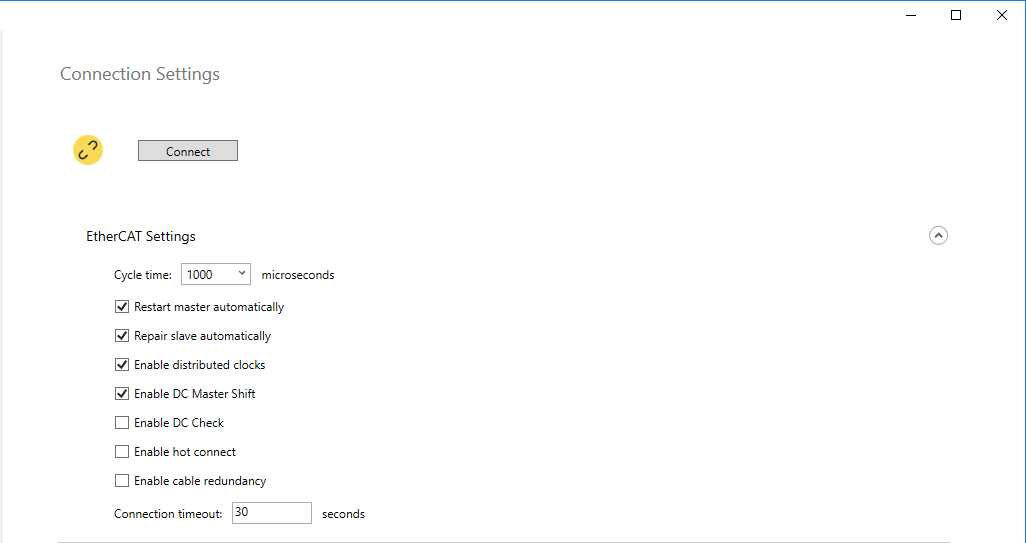
Contains the basic EtherCAT and system settings you need to configure before connecting to KINGSTAR.
Connect / Disconnect: connects the KINGSTAR Subsystem to the hardware. After the connection is established, the button becomes Disconnect.
NOTE: As long as Configuration Tool is not closed, all the settings are preserved, even if you disconnect the Subsystem from the hardware.

EtherCAT Settings
Cycle time: the cycle time for the EtherCAT network. You can use the Cycle time list to select a cycle time, or enter a value in the box. The fastest cycle time supported by the KINGSTAR Fieldbus Runtime package is 1 millisecond (1000 microseconds). If you need faster cycle time, get High Speed Timer Package. Keep the following in mind:
Start Restart master automatically: if a cable is disconnected, the EtherCAT master restarts automatically after a cable is plugged in. Repair slaves automatically: if any slave disappears (due to the replacement of a servo drive, cable disconnection, power cut or other issues) or goes to an EtherCAT error state, it restarts automatically. Slaves that are not in an error state are not impacted and continue to function normally. Enable distributed clocks: enables or disables distributed clock synchronization. Enable DC Master Shift: determines the reference clock used to synchronize the devices on the EtherCAT network. There are two modes: Master Shift or Bus Shift. If this check box is selected, Master Shift will be used. Master Shift: the reference clock is the clock of the first slave on the EtherCAT network with the DC capability. Bus Shift: the reference clock is the master's clock. Enable DC Check: enables distributed clock (DC) checks during the startup of the KINGSTAR Subsystem. Enable hot connect: adds new hardware to an EtherCAT network while the KINGSTAR Subsystem is running. Enable cable redundancy: enables cable redundancy. The last EtherCAT slave is connected to another network interface card on the computer so all the slaves can be communicated even if one cable is broken. Connection timeout: the amount of time allotted for hardware to be connected to the KINGSTAR Subsystem. An error message will be displayed if a connection is not established within the given time. Some hardware may need more connection time than 30 seconds. Enable axis/IO index aliases: this option appears only when Support index alias is checked in the Options setting. Select this option to enable alias indexes for the axis and I/O index parameters in all functions. You can then choose to display devices in alias order in the Device List. See Display Devices in Alias Order for more details. This option can be enabled/disabled either before or after connecting to KINGSTAR. If you enable/disable this option after connecting, a Send button appears next to it. Click it to apply and save the change. |
Axis Settings
Supported access mode: sets a data transfer mode for EtherCAT drives. For more information about the modes, see Concepts > Control modes.
Support synchronization control mode: enables the Modes of Operation and Modes of Operation Display objects. It changes the control mode through PDO instead of SDO, so the control mode can be changed faster (usually in 3-5 cycles). Not all servo drives support this feature. Enable digital input: enables access to the digital inputs for all axes. Not all axes have digital inputs. Enable digital output: enables access to the digital outputs for all axes. Not all axes have digital outputs. Allow access to secondary encoder: enables the access to the internal position of an axis. Enable actual velocity: adds the actual velocity variable to PDO. Enable actual torque: adds the actual torque variable to PDO. Enable actual current: adds the actual current variable to PDO. Enable following error: adds the Following Error variable to PDO. Enable torque offset: adds the torque offset variable to PDO. Enable touch probe: adds the TouchProbeControl and TouchProbeStatus variables to PDO. Save and restore position offsets: select this option to enable the Save and Restore Actual Position Offset feature in the project. This action displays the activation buttons described below for saving and restoring the position offsets for the selected axes and enables axis settings to specify whether the feature is applied to each axis (see Save and Restore). This option appears only when the Save and Restore Actual Position Offset feature is enabled (see Step 1 in Save and Restore Actual Position Offset). NOTE: If a Position Offset file has not been chosen, a prompt appears when you select this option, asking you to select or create a file. After selecting the Save and restore position offsets option, the following activation buttons appear:
NOTE: If the Subsystem detects a mismatch between the offset values in the Position Offset file and the project file when clicking this button, a Data Conflict prompt will appear. You can choose either way to ensure data consistency: Use the data in the position offsets file and replace the offsets in the project. Use the offsets stored in the project and overwrite the position offsets file with them. |
RTX64 Settings
Display the messages of the real-time subsystem: displays the messages of the real-time server on RtxServer. Devices Settings
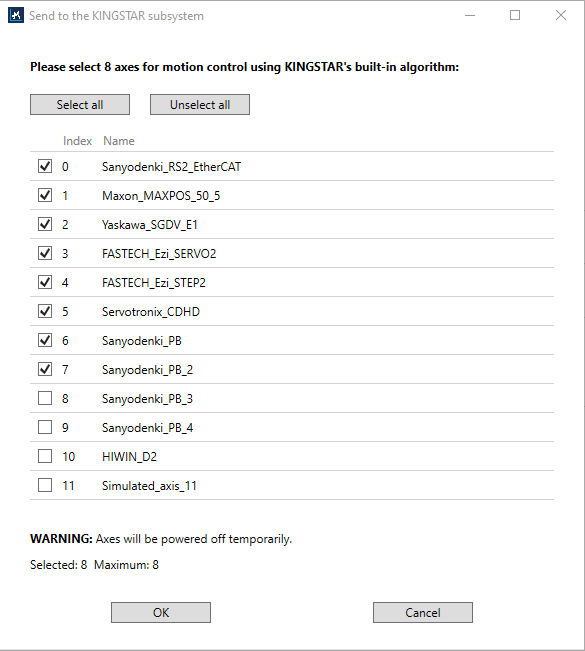
Sets a number of devices you want to use. You can leave them as zero if you have real devices to connect. If there is no real devices, you must specify a value to the following boxes, so your computer can have simulated devices to use. Required axes: sets a number of axes to be created on the EtherCAT network. If the required number is greater than the number of the real axes, the system will create simulated ones to meet the requirement. Required IOs: sets a number of I/O modules to be created on the EtherCAT network. If the required number is greater than the number of the real I/O modules, the system will create simulated ones to meet the requirement. Select axes to be used with KINGSTAR control modesThe total number of axes supported by KINGSTAR control modes depends on your license. The total number is the sum of your real and simulated axes. For example, you have purchased the Axis Level 1 package, which supports eight axes. You can have five real axes and three simulated ones, or four real four simulated. These eight axes can be controlled by KINGSTAR control modes. The axes other than these eight are controlled by the manual mode (modeManual), in which you have to use your own motion functions to move your axes. When the value in the Required axes exceeds the number your license supports, Configuration Tool asks you to select the axes you want to use with KINGSTAR control modes. In the following example the license supports eight axes, so we can select eight axes at most. After selecting the axes, click OK to connect.
|


NOTE: After the connection has been established, the devices will be automatically displayed on the device list. By default, the devices displayed on the list will be arranged sequentially according to their EtherCAT connection order, with the displayed name of the device being the device's index. If you want to reorder the device list, you can use the alias* function (WriteAxisAlias or WriteIOAlias).
alias* If the alias function is enabled and the displayed order of the devices does not follow the alias order (instead, it's displayed in index), please do the following:
1. Open the KsTuning.exe.config file in C:\Program Files\IntervalZero\KINGSTAR\bin\ksm64Tuning, find the ApplyAlias and change the value to "true".
2. Use your own program to establish the EtherCAT connection and set up the aliases for the devices.
3. Open the KINGSTAR Configuration Tool and re-connect to the KINGSTAR Runtime to update the alias order. Ensure the ApplyAlias value in Step 1 has been configured before starting the KINGSTAR Configuration Tool.
NOTE: Alias is not fully supported by the Configuration Tool. The known limitations are listed below:
1. If ApplyAlias is set to true, The Configuration Tool cannot start the EtherCAT connection correctly by clicking the Connect button.
2. If the Configuration Tool project is saved when ApplyAlias is true, the alias cannot be used by the Configuration Tool and the KINGSTAR APIs for creating an EtherCAT connection.
See also